#WooCommerce #WordPress #Tutorial WooCommerce help and tips to learn how to manage your WooCommerce store products, inventory, and export orders.
WooCommerce Adding A New Product Part 1

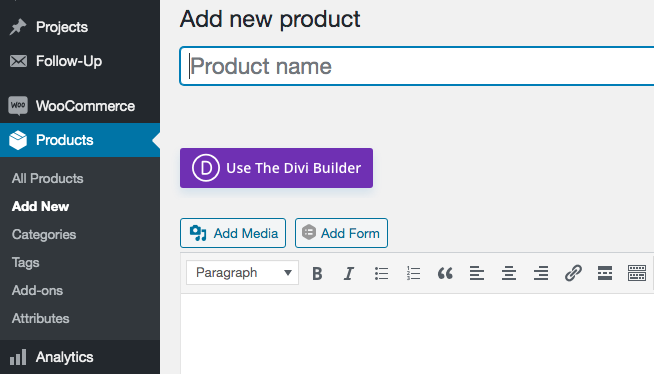
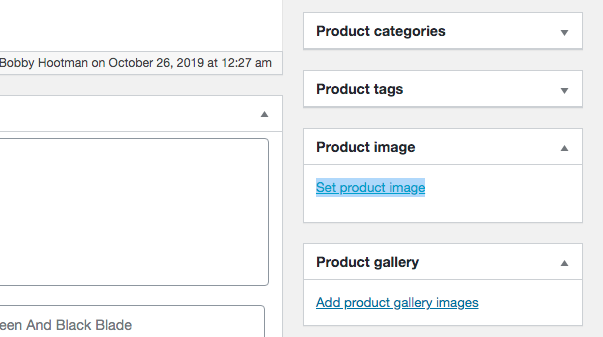
We will be going over how to add a new product to your website. First you want to be in your dashboard then to the left and your menu you want to press products then underneath products you want to press add new and it’ll bring you to this screen in this screen you can add your products name and if you scroll down you can add the price of your product and a short description of your product then to the right and second from the bottom you can select a set product image I’ll select the butterfly knife a set product image scroll back up and press publish on the right side of your screen then if you wish to view your product on your website at the very top says product published and press the link next to that.
WooCommerce Changing Your Product Image Part 2

We will be going over how to change your product image on your website. So first, you’re gonna want to be in your products all products this will show you a list of all the products you have on your website so if you hover your mouse over the name of your product you can see edit quick edit trash view and duplicate you want to press edit to change your image you scroll to the bottom click the image to the right side of your screen select the image that you want to change to set product image scroll back up and press update near the top right of your screen then view product
Woocommerce Changing Your Product Price Part 3

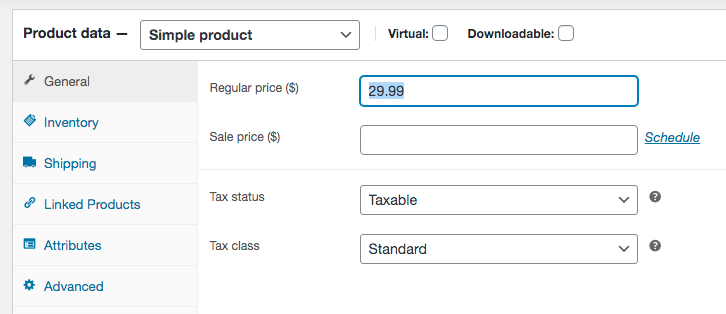
We’ll be going over how to change the price of your product. First, you want to be in your products then hover over the name of your product and click Edit then scroll down until you see the regular price right here then type in the amount you want for your product then press update if you wish to view it go to the top and press view product.
WooCommerce Changing Product Shipping Dimensions & Weight Part 4

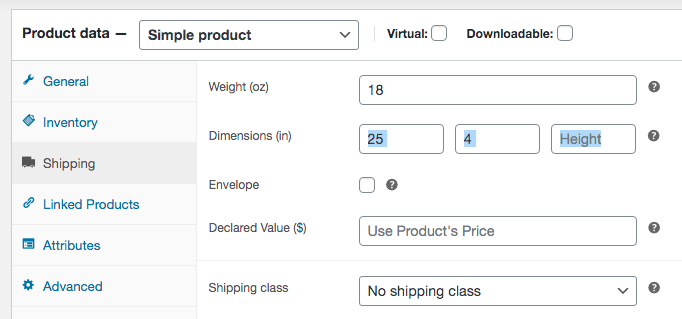
We’ll be going over how to change your shipping dimensions and weight. So first you want to go to your product and press edit wait for it to load scroll down and go down to your regular price and to the left, you have all these different options press shipping then change the weight of your shipping the length of it the width and the height then press update what this will do it will show your customers the weight and dimensions of the shipping box that your product will come in.
All In One SEO WooCommerce Products Part 6

Using your all-in-one SEO pack with WooCommerce. if you’re on the all in one SEO pack general settings page you can hit a command F and search for products that should take you down to the custom post type settings where you can check the products’ categories and product tags another quick key is to hold the command key and hit the up arrow to get the top of the page and click on update options once you’ve updated your options you can go to a WooCommerce product I’ll go to all products and then click Edit on a product and then if you scroll down you’ll see your all-in-one SEO pack options where you can add your description of keywords.
WooCommerce – edit and manually sync a product from Lightspeed
How to add and sink a product with Lightspeed. You want to log in to the dashboard, go to WooCommerce and then click on Lightspeed. In the box on the top right you want to search for the product that you want to add so that it can pull it from Lightspeed. Click edit, select the categories that you want the product to appear in, scroll down and click on “set product image”.
Once the image is uploaded we can select the image in the media library and click the “set product image” button on the bottom right. We’re going to go ahead and publish the product. Then we want to manually sync by scrolling down and clicking the button “manual update from Lightspeed”. This will ensure that all of the SKU numbers and variations are
Pulled over from Lightspeed to the WooCommerce product. Lastly, we want to view our product and choose a color and size to ensure that the proper SKU number is being displayed and that our product is ready to go.
WooCommerce Export Orders
To export all your orders, plug in to your website. Scroll down ’til you see on the left side “export orders” and scroll down go again and you’ll see a button that says “export”. Click the export button and you will get it in a CSV file.
WooCommerce Custom Field
To use the WooCommerce custom field you’re going to install the plug-in and you’re going to go down to settings, WC Field, and then on the top left you’re going to click on add field. I’ve already pressed it here. And then you want to give your field a name. I’m going to have the name, the label all be the same. And then the tag that you intend to use on the product so that’s what’s important. So we’ll just save these changes.
Now we’re going to go to our WooCommerce products and tag the products that we want the field to appear on. Then you can click the quick edit to add a tag and then click update. Once we’re back on the products list, we can view that product by hovering over the name of the product, clicking view, and then we can see our personalized form right here above the Add to Cart. So once the person chooses their options and types in the name, they can now add this to the product with the custom field.
Recent WordPress Articles
- 5 Killer Reasons WordPress Update Issues Are So Difficult
- 6 Faster Ways: WordPress Website Design For Web Designers
- 5 Essential Divi Builder Guides
- Preparing for managed Divi Hosting
- Managed WordPress Hosting – 3 Reasons You Need It


